This sample of work was my first version of my Vertical Pallet Gardens. It’s more of a picture than a pallet, and over time I have reduced maintenance to a minimum by some simple alterations to the frame. The garden is now approximately 18 months old and becoming a favorite with the local birds wanting to nibble on the succulents. From the outset, I was determined to make my garden a little better than all the posts I’d read online and set about creating a planter that should stand the test of time. Even though generic pallets are made to withstand heavy loads and survive abuse from a forklift, their one weak point is weathering. The individual timber struts are also prone to splintering and cracking.
Vertical Pallet Gardens – My Design Idea Process:
A vertical pallet garden is essentially a sealed environment containing soil or potting mix, moisture and fertilizers. Naturally plants too, but predominantly their roots. I needed to protect the timber pallet from this constant exposure. So, I chose to coat every internal surface with a rubber seal. This is the same product as for waterproofing, applied with a brush or roller. I also made the decision to avoid wrapping the back with landscape fabric. This decision was mostly because I hated the aesthetic and the soil makes bulges on the rear. Instead, I use cut-to-fit plywood sheets, also sealed for protection, and they make the structure more rigid when filled with soil. I enjoy the building more than the planting, and the gardens can only really be appreciated once the plants start to grow.
Vertical Pallet Gardens – Pallet Prep:
What makes it worse is that I tend to favor succulents over other plants. They grow slowly, but given the crazy temps we get here in Melbourne, Australia, they thrive on minimal water when compared to the rest of my ‘regular’ garden. I start with a regular pallet, not that any pallet is really ‘regular.’ They come in all sorts of sizes. Next, I add or remove slats on the front to maintain a decent space between the planks for planting. Then I remove all of the slats from the back. I add additional planks to seal the top and bottom of the pallet, creating a deep tray. Then I seal the internal timber as mentioned earlier.
Vertical Pallet Gardens – Option #1:
The next step depends on how patient you want to be before displaying your vertical pallet garden.
If you want to show the garden in the upright position ASAP, then this step is crucial! Cut-to-size strips of square wire mesh (use approx 20mm mesh, comes in a roll from the hardware) to cover and overlap the planting spaces between the planks. Secure the strips to the INSIDE front-face of the pallet with a staple gun. The view from the outside front is alternating rows of plank, mesh, plank, mesh, etc. Now, over top of the mesh, on the internal front face, attach landscape fabric, securing with a staple gun. Fill the pallet cavity with a premium organic potting mix. This will give your plants the best chance at creating secure roots and growing into healthy specimens. Once full, attach and secure the plywood sheet to the back. You should now have a sealed pallet ready for planting. The general idea is to snip the mesh in the areas you intend to plant, but only snip the tops… then fold down-and-out like a tiny shelf of squares, approx 45º. Now pierce the fabric within a cross shape (+ plus sign) and make a space in the soil for the plant (personally I use a 10mm dowel stick and create a tunnel), Insert the stem of your clipping or rootball of your plant through the cut fabric into the tube, and rest the leaves or foliage on the mesh shelf. This will prevent the plant from falling out of the soil before it has a chance to root in the pallet.
Vertical Pallet Gardens – Option #2:
Attach and secure the plywood sheet to the back of the empty pallet. Place the pallet flat on its back, face up. Now fill it up with the good stuff through the open area between the planks. Arrange and plant as desired. Give a proper watering to ensure all mix is moist and then leave flat for 3 to 4 weeks. Try to resist the urge to add more water before you place the pallet garden in the upright position… you want the excess water to drain, so the weight is reduced, especially if it will be hung or suspended.
Vertical Pallet Gardens – Watering Challenges:
Ensuring your garden gets enough food and water when in the upright position is a challenge. Simply watering from the front with a hose is a false sense of achievement as the bulk of the water just runs off, thanks to gravity. What you really need is a drip-feed solution, preferably containing some form of liquid plant food mixture. My solution was to drill 4 to 6 evenly spaced 30mm holes, using a spade bit, through the TOP covering plank, essentially the lid of the planter. The I cut six plastic drink containers in half, keeping the half with the lid attached. I pierced a tiny hole in the center of the lid and the inserted the lid into the 30mm hole in the timber, filled up each bottle with a premixed solution and let gravity do a better job! It takes a while for the solution to work through the layers of plants, but definitely get a more even saturation and the drips that come out the front go to the next layer below. I have six bottles, each dispensing about half a liter twice a month, depending on the heat. See the photos attached to make sense of my rambling.
Vertical Pallet Gardens – Want more info? Go Here:
For more info and to see what we’re up to, find us online: www.facebook.com/verticalpalletgardens and Instagram @verticalpalletgardens. Website coming early 2017: www.verticalpalletgardens.com.

Clean & sand down a pallet. Be sure to use Heat Treated pallets and not chemically-treated ones!

Painting the pallet

Paint the backer board too!

Frame the pallet. This one was done with mitered corners.
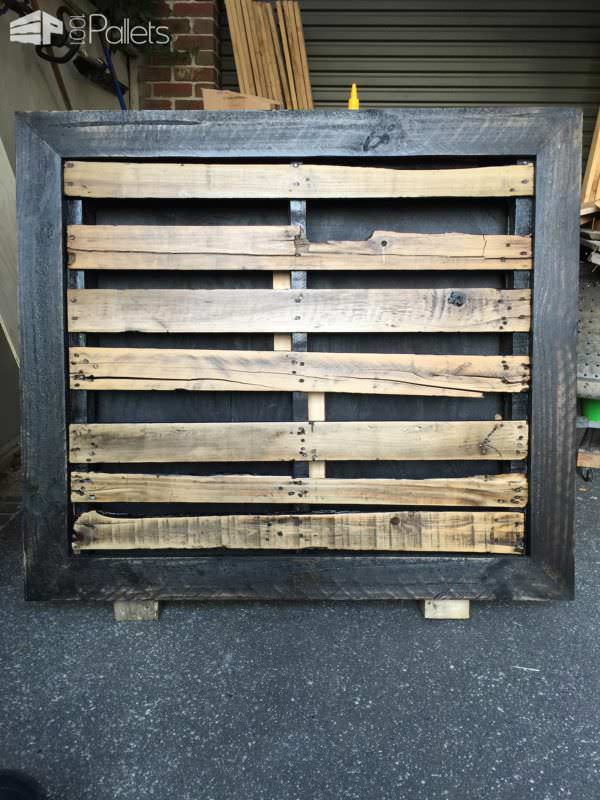
Sand & paint the frame too. After painting, another light sanding will give it a lovely weathered look.
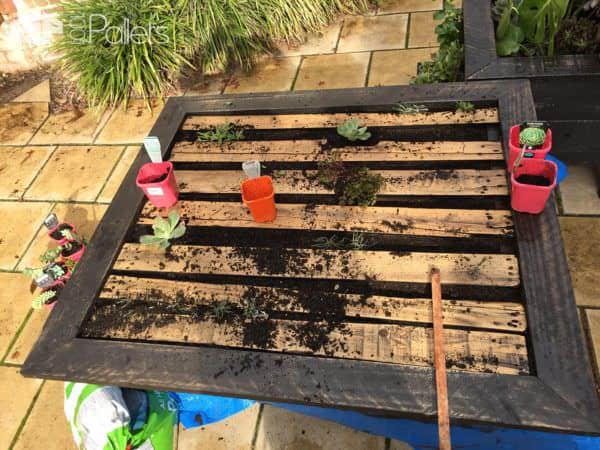
Fill in the crevices with potting soil mix and then start having fun!

Add interesting decorative touches to suit your decor.

Drill holes.
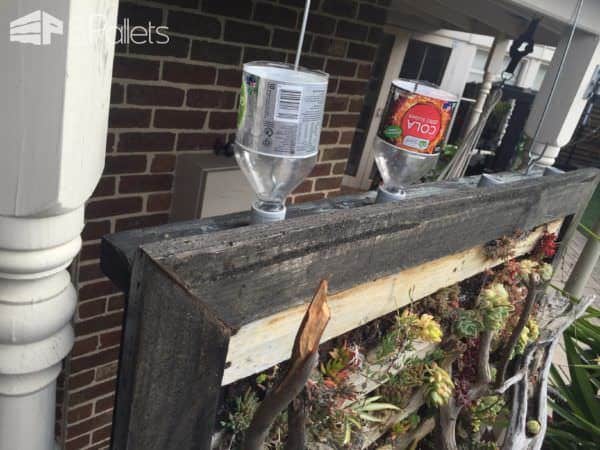
An easy way to water. Use old plastic bottle tops.
If you’re dealing with a small porch, patio or limited back yard space, here’s another very good idea for a Small Space Vertical Garden!


