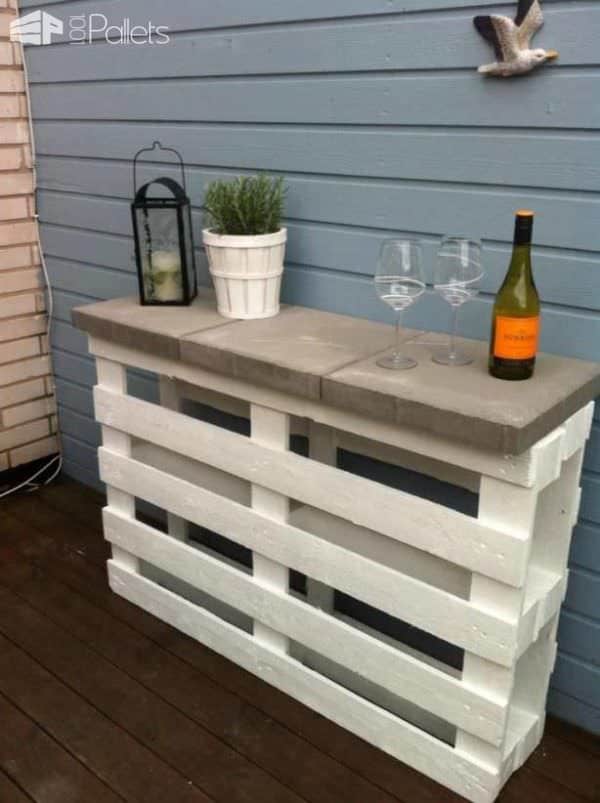
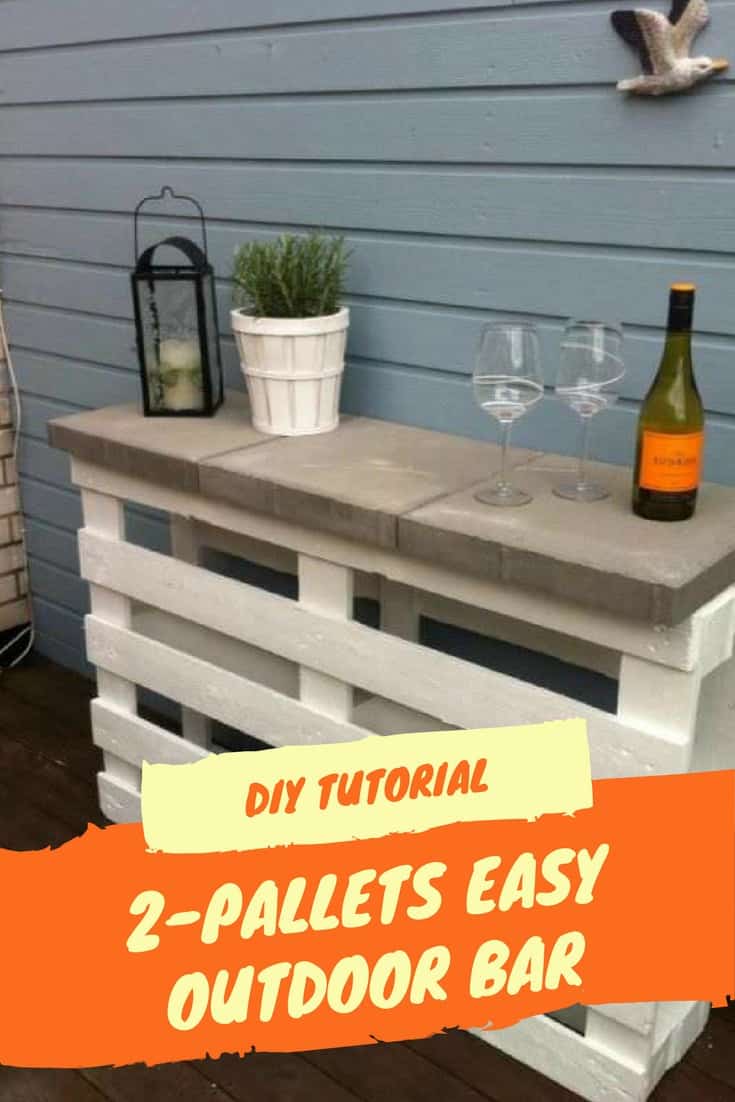
Bigger isn’t always better. Why not create a fun outdoor easy DIY project: This simple pallet bar is perfect for your deck, backyard patio, or garden area?
You can build this pallet bar in about two hours!
In two hours, along with two pallets and a few miscellaneous supplies, you’ll have a mini party-bar that you don’t have to elbow up to! And the best with this pallet bar is you don’t need to dismantle the pallets ;)
| Preview | Product | Rating | Price | |
|---|---|---|---|---|
|
|
Miniature pallet coasters - set of 4 | 3 Reviews | Shop Now |
Step-by-step instructions to build this pallet bar:
What You’ll Need:
- Two wooden pallets (same size!)
- 1″x3″x12″ board cut into four equal pieces (optional as reinforcement when screwing pallets together) – or use a scrap pallet board and cut four pieces from it
- Drill
- Lightly damp rag(s) to remove sanding dust
- Sandpapers or palm/random-orbit sander
- 4 to 8 screws (minimum three screws per set of outer boards)
- Good quality exterior paint/primer combo
- Paintbrush
- Cotton applicators or a small hobby paintbrush
- Dropcloth to protect your patio
- Gloves
- Two clamps (or a friend willing to help hold the pallets together for you)
- Three paving stones (or more, depending on the size of pallets and choice of stone pavers)
- Heavy-duty construction adhesive suited for both concrete and wood.
Preparation & Painting:
First, find two pallets. Please don’t take them without asking first. Remember, some stores do participate in recycling programs themselves, and it’s always polite to ask! See our page for places to get pallets for free.
Next, sand both pallets down fairly smooth to remove splinters; check out our best wood sanding tips. They don’t have to be perfect because you’ll paint them to protect them from the elements. Remove the dust with the lightly damp cloth, and paint both pallets thoroughly. Remember: encapsulate them to protect them from the elements, so it is important to paint them before joining them. Allow the coat of paint to dry. Apply a second coat per the manufacturer’s directions (some may have you lightly sand between coats). Cut a 1×3″ board into four pieces (optional reinforcement), lightly sand, and paint those simultaneously.
If you are not sure about how to paint your pallets, check how to paint pallet wood.
Assembly and finish:
Clamp the two pallets together. Pre-drill the screw holes; you intend to prevent the boards from splitting. Attach the two pallets using the four wooden strips and fasteners (optional). Now, paint any decorative touches you want on your pallet bar (such as your family’s name or the bar’s name) in whatever color you like. Next, Dry-fit the tiles. Once you have them fit your liking, lift one, generously apply the construction adhesive to the pallet’s surface, and firmly press the paving stone back in place. Repeat on the remaining pavers.
And if you can’t make it, you can also find pallet bars and shelves on Etsy. And follow check out this article for plenty of other DIY pallet bar ideas.
Here is a video that will show you how to make a bar like a picture above. The video does not use reinforcing wood strips.


This actually took much longer than two hours, but I am happy with the results. Note that not all pallets are the same size as this, so be sure you pick up pallets for the size of finished bar you want.
Can’t wait to try this!!!
This project was shown on The Kitchen (FoodNetwork) the pallets were attached with two boards in the bottom section and then again in the middle as a brace to help hold the pallets together. The pavers were attached to the top with a heavy duty adhesive applied with a caukiing gun. Hard to believe how many times I’ve seen this posted with nothing more then 2 pallets and 3 pavers.
Pretty much the same picture and always up against a wall, not out in a room where it might be bumped!
I might even attach wooden braces on the out edges along the floor. I moved many pallets working in a grocery store. Some made of pine, easy to move and barely ever stable when on end. Then there were the back braking oak pallets that stood pretty good on end but still,not to be trusted.
Love mine
I love all of the pallet ideas here, but this one makes me really nervous every time I see it around the web. It’s begging to be climbed on by small children. I know that I would have climbed it if it were available to me as a child. I feel like it needs a more substantial base. Thanks, Crafter-Mom-Nana
Can somebody tell me if you need to fix the slabs on top? Also do you need to attach the whole thing to a wall or is it sturdy enough to be free standing? x
nice
Is there a tutorial for this project? Or actual directions for the challenged?
Sorry we didn’t have a tutorial but it shouldn’t be so difficult to made :)
Why? So many questions about this and there’s no tutorial? Seems kinda silly. What may be simple to you… isn’t for others. Great answer.
Difficult to MAKE*
What a fab and simple idea! Looks really cool.
A faire aussi
Moi aussi J’veux!
Lilly Madeleine Et ça aussi!
Would you roll the paint on or spray it on????
We painted them with a brush. After painting, it needs to be covered with weatherproofing. The bottom boards of the pallets (there are three) are to be removed as well. Placing the pallets back to back, they can be screwed together with long nails as well as throwing some wood glue in there. The pavers can sit on top without falling over or can be secured with cheap concrete mortar type material (similar to that of which is used when setting cinder blocks for a foundation.
Does removing the three boards at the bottom help the pallets stand on their own?
I wondered if I would need to secure the pallets to a flat piece of wood to stand up. Did you nail yours into the wall?
What size- how tall and how wide are the pallets? and what dimensions are the pavers?
I’d like to know how the pallets are attached, and if the whole thing is top heavy….
I’d glue the pavers down with concrete or paver adhesive, the kind that comes in tubes that you put in a caulking gun
How do you secure the pallets together and keep the pavers on the top?
thanks for the idea
Love it! How do you keep the pavers on?
I used this idea then added feather edge to finish it off
simple mais beau et facile à faire :)
jolie j aime bien
gefällt mir :) klasse !!
DO YOU SECURE/NAIL THE TWO TOGETHER??
did you get the answer to your question on how to hold together?
How do you secure the two pallets together?
Yes, it’s better to do that !
What are the size of the pavers, and where did you get them? great idea!
super ça…. ;)
So simple and yet so gorgeous. Well done!
Adrian Carter for next to bbq we never have enough room near it
preciso fazer um desses urgente!!!!!!!!!!!!!!!!!!!!!!!!!
Tanja Amberger Sieht nen hammer aus ♥♥
Adoguei ;) <3
Think I´ll make one this weekend ;-)
So have you built this yet?
Super!!!!
Ah celle-la… c’est une bonne idée ! A votre santé !