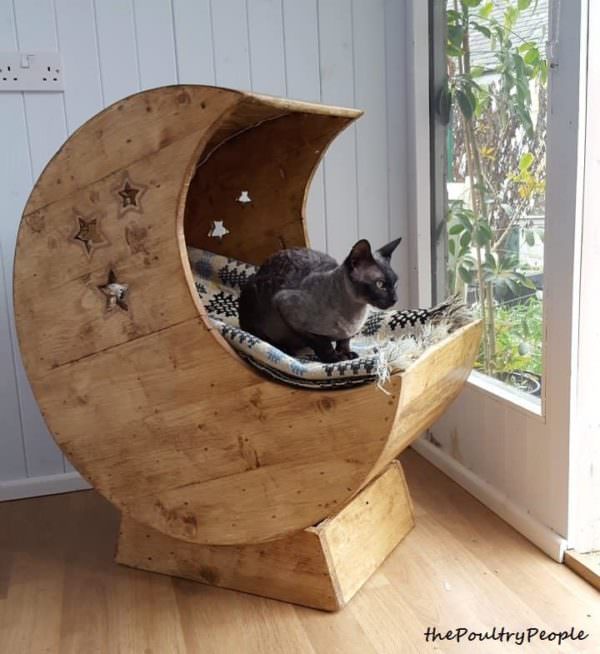
This smaller LED-Lit Pallet Moon Cradle For Kitty is fairly simple carpentry that mostly uses butt joints throughout. As usual, the more tools you have, the quicker you’ll be. Here’s a list of the tools & supplies I used to make this project:
- Circular Saw
- Jigsaw
- Planer
- Router or Biscuit Jointer
- Chop saw
- Belt and Orbital Sander
- Kreg Pocket Jig set
- Nail gun
- Stapler
- Drill corded and cordless
- Hammer, nails, screws, string, and pencil
- Wood glue
- I added a few touches like remote control LED strip lighting and some glow in the dark highlights around the stars
- Finish was done in Briwax furniture polish with a medium brown tint
- Glow-in-the-dark resin
LED-Lit Pallet Moon Cradle For Kitty – the sides:
Get a couple of good, clean pallets with thick, decent timber and break them down. Remove the nails.
Lay the planks out, push them together and plane them so that they fit together fairly flush.
Decide on the size of the crib that you want and get some string.
Find the center and put in a screw, attach the string and add a pen to the length you want. Draw out the main circle.
Cut the circle out using a jigsaw.
Use a router with a biscuit jointing bit or a dedicated biscuit jointer and cut the slots in between the planks.
I then used a Kreg Pocket Jig to secure the planks together using pocket screws and plenty of PVA glue.
Repeat for the second side.
Leave overnight to dry.
LED-Lit Pallet Moon Cradle For Kitty – Beginning the Assembly:
Cut two long pieces that will be the base for the pallet bed. Add glue and screw to the inside of each moon side.
Decide on the width of the cradle. Cut a load of smaller 1×3″ deck boards to go around the outside and for the bed of the cradle.
Balance or clamp your two sides and start adding the timber. I started at three different places and stabilized the build quickly so that I could finish the rest rapidly.
I used the hammer and some straight nails to initially assemble. Once it was in one piece, I switched to the air nail gun. Each piece was glued, and the outside edge boards were planed and routed to fit the curve of the piece.
Allow to dry overnight.
LED-Lit Pallet Moon Cradle For Kitty – The Base:
Hold up a piece of wood against the curve of your sides and mark with a pencil to transfer the curve shape. Cut out with the jigsaw. Cut the ends at a slight angle and nail in the ends. Make the base about 2 inches narrower on each side to the main cradle for aesthetic quality.
LED-Lit Pallet Moon Cradle For Kitty – Fun Details:
I found a sheet of stars using a Google image search, printed them out and used them as a template. Next, I drew around them with a pencil, drilled a hole in the center of each one and then cut the shape out using the jigsaw.
I then went further and routered a shallow groove around each star.
Finally, I filled them in with a glow in the dark resin mixture. Let it cure per the manufacturer’s directions.
LED-Lit Pallet Moon Cradle For Kitty – Finishing:
The finish I decided to use was Briwax in a medium brown tone. It’s a good quality product and has a nice warm color. It’s easy to buff to a nice shine, too.
I applied it with a brush and buffed up with a soft cloth. More applications will be beneficial to achieving a deeply layered finish.
Next, I added multi-color remote control LED lights, about £10 on eBay. I secured them using a stapler to attach as the sticky backing, as it won’t stick very well to a waxed surface. Then, I drilled a small hole into the base, and the infrared receiving diode is inserted into the control box attached behind.
Be gentle with the led strips! They can be really fragile! You might want to try the outdoor ones with the added protection. Also, you can damage them with the stapler quite easily, so take your time.
I had some foam which I cut to size and then threw in an old blanket, some soft toys and a sprinkling of catnip.
It works a treat, the cats sleep in it and occasionally use it as an ambush post.
A great project for cat lovers!








Arno pour les mini humains *_*
Thomas pour Fripouille ! ?
By Adopteunecaisse
Hi there, your cradle looks amazing, I’m attempting my own shortly, just wondering how you shaped and fixed the shorter timber that you connect both sides with? I’m considering using 1″ x 3″ plank and fixing with pocket screws and biscuit joints; and then trying to shape with a hand held electric plane; what would you advise? cheers, Jim
That is gorgeous!
Thank you, Ive made another since then for a friends dogs :)