Christmas is here, and I wanted to create my own Christmas decorations using wooden pallets. So, before opening a beer with the boys, I planned to create decorative pallet stars, tiny pallet houses, and a pallet Christmas tree.
To make it easier for you, you can watch my video on making the stars and the Christmas tree. You may find everything you need to get started there, or you can clarify the instructions below.
Hardware Requirement

- Pallet wood
- Face mask
- Glasses
- Gloves
- Sanding Tool
- Hammer
- Measuring Tape
- Nails
- Handsaw or Chop-saw
- Knife
- Pliers
- Pencil
- and Paint of your choice
Dismantling The Pallet

Using two hammers, I dismantle the pallet. My goal is to reuse all the nails used in the construction of this pallet so I can reuse them in the construction of my project.
Sanding

Let’s sand the pallet boards to give them a nice, smooth texture.
Building The Houses

Since I am using a power saw and will be placing my hands and fingers near the blade, I have to be very careful to work as safely as possible.
To create the pallet houses, I use the thick pallet wood that is usually used to separate the bottom and top of the pallet.

To create the roof of the houses, I cut 45º angles on each side of the pallet. To get this 45º angle, I need to draw a square and then cut along the square’s diagonals. Since the width of my pallet is 8 cm, I create a square with 8 cm sides each and then join the diagonals.

Then, by cutting along the square’s diagonals, I can extract two houses and two triangles of 45º angle each. Since I’m not particularly eager to waste wood, I cut two pallet blocks and glued the remaining triangles to them. Once the assembly has dried, I’ll sand the edges and make it look like one piece of wood. That’s it, simple as that.
Building The Stars
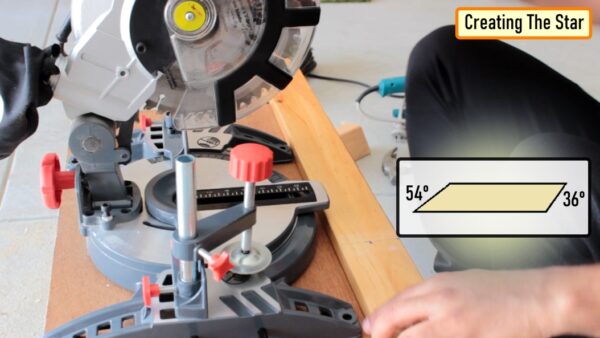
To build the stars, I still use pallet wood; however, you can use any wood of your choice, the construction principle is the same.
Each star has five long sides that are 7.1″ long and five short sides that are 6″ long.
Each of these ten pieces will have one side cut at a 36º angle and the other at a 54º angle.
Cutting a 36º angle is easy. Turn the saw blade to 36º, then place the piece of board upright and straight, then lower the blade, easy as that.
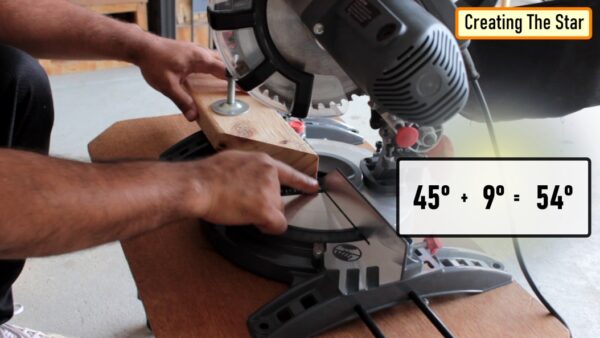
However, since the miter saw only goes up to 45º, cutting a 54º angle is not as easy. To do this, I had to create a 30º template on one side and 45º on the other side. Now let’s do the math, 45 + 9 = 54º. So, to cut the 54º angle, I need to set my miter saw to a 9º angle, then place the pallet board next to the 45º side of the template, and then drop the saw. Boom, I made it.

To create the star, we need to glue the 36º angle of the long side to the 36º angle of the short side, as shown in the video.

As I showed in the video, once the sides are dry, join the corners at 54º precisely.
Building The Christmas Tree

Now let’s create the Christmas tree. First, we’ll sort out the top part. Cut a 5.5″ and a 6.5″ pallet board with one side cut at a 30º angle on each board. Next, cut 4 x 7″ boards for the sides. The bottom boards will also need to be cut at a 30º angle each. The base measures 14.5″ long.

For this installation, I cut 2 x 4″ boards for the trunk and a 5.5″ board for the base of the trunk.

That’s it; all that’s left is to glue all the boards together. Stay blessed and have a Merry Christmas and a Happy New Year…




Thanks for all the measurements and instructions. I have been seeing this tree and star for week but you are the first to show details