Everyone desires the good things in life. Whether you’re a homeowner or a tenant, having a nice-looking and decent portable generator enclosure is one thing. Having it strategically placed and occupying not too much space in your compound is something that wouldn’t slip your wish.
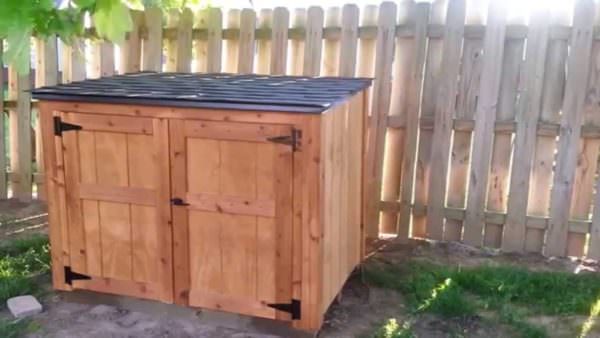
While all of this is good, learning how to build a portable generator enclosure is one adventure, a lot of people wouldn’t want to dare. Even as scared as it may seem, you’ll need to choose between coughing out a lot of money to buy a generator shed and paying some half-baked builder through your nose for a substandard generator shelter.
Ironically, these builders are neither angels nor superhumans. They simply summoned confidence, stooped, gave their gusto a needed try, and are able to competently deliver something that you admire a lot.
One other thing that scares people is resources, especially money. Many people think that building a generator shed requires a lot of money. But guess what, you don’t have to break the bank to do a DIY generator shed. With manageable resources, you are able to get one for yourself.
So now, why do you think you cannot on your own or build a Do-It-Yourself portable generator enclosure out of recycled pallets for example? Who says you need some out-of-the-world sophisticated skills or techniques to construct a simple, strong, and weather-resistant generator house for your plant?
In this post, you’ll learn the simple and easy-to-follow guide on how to build a portable generator enclosure. Never forget so quickly that common injunction that every builder will have to get down to plans before execution — included in that your plan is the question of the materials and equipment you need to be able to have a seamless execution. Within 24 hours or less, you should be able to complete building your generator shed.
Materials Needed to Build a Portable Generator Enclosure
- 2 pieces of 2×4 lumber
- 1 piece of 3×4 plywood
- 4 pieces of T1-11 siding
- ½ brad nails
- Wood filler
- Wood glue
- Stain/paint
- Screw
- Sealant caulk
- Bungee cords
- 3 louvered vents
- Aluminum sheets
- Measuring tape
Extra add-ons
- Transfer switch
- fans
Buying Considerations of Materials
It is important to know that when buying certain accessories and materials, you need to be properly informed and guided. Especially when buying the lumber, you should be careful when choosing the planks. The planks must be straight and without any visible flaws or blends, including cracks, knots, twists, or decays.
You’d have prevented a lot of potential hitch or damage to your enclosure if you take with great care before investing in cedar or other weatherproof lumber. The project will lack a symmetrical and aesthetic look if there is a mismatch in the procedure. This is why you will need to align and plumb the components prior to injecting the electrified screws.
Now that we have taken care of all the precautions, list all accessories, know how long it will take, and how it will cost, we shall start the step-by-step procedure to make a small generator enclosure.
What building options are available?
There are quite a number of choices you can make to build your portable generator shed. Basically, there are three options available from which you can choose to build. It all depends on you and the style and size you want to make.
Option # 1: Direct contact
You can put the generator enclosure on dirt or grass. This is adjudged the easiest method of building a generator shed. But it can spin some money off you. Try to plan yourself well and calculate your budget well before opting for this. In this regard, your generator shed is usually placed on a pair of PT 4x4s. Preferably, try to get a location with plenty of ventilation and drainage, and not packed soil. The danger of using packed soil is that it does not provide ventilation and could cause a pool of water to attack the generator when there is a heavy downpour.
Option #2: Gravel Option
The second option is by placing your generator shed on a ground that is gravel-filled. The advantage of this option is that it will prevent direct contact with hydration. Water caused by drainage or erosion could rust the generator. Using the gravel option potentially reduces the risk involved with this damage.
Option #3: Concrete Option
The third offers you the opportunity to place your generator enclosure on a concrete pad. If you’re a low-income earner or you’re on a low budget, this is the best option for you. It does not require too much, and it gives support to it. In terms of durability, the generator shed placed on concrete lasts longer.
Why enclosing my generator?
This is one important question that requires an urgent answer before we continue. But again, your answer will be as apt as answering someone why people choose to sleep under a roof rather than over it or under a bridge. Without delay, these are reasons why you need to put your generator under a shed.
Decrease noise levels
Besides the fact that our polluted ecosystem needs to be depleted from a lot of carbon dioxide, there is a need also to reduce the level of noise that comes from exhaust-producing industrial and domestic machines, including generators. What we currently have as portable generators produce a lot of noise. You’ll need to keep some reasonable distance when using them. Using a soundproof baffle box as an enclosure, you will be reducing the number of sounds that come out from the generators.
Protection against theft
You can be sure that your generator may be stolen if you leave it unguarded. It becomes an easy target for thieves if you leave it out in the open. Enclosing it, therefore, gives some sense of protection and security and creates fear in anyone targeting to steal it.
Creating some space
Putting your noisy and big generators inside a shed frees up some storage space in your compound. Although you may have a spot to place or store your generator, giving it an enclosure outside frees up some space in your garage.
Protection from weather conditions
There is a lot of rain or snow that could cause corrosion and rust to your generator if it is exposed to the air unprotected. Hence, constructing a sturdy generator enclosure will ensure that your generator is protected against the various elements of the weather. Rain, snow, wind, the sun will drop on it and provide the biggest hindrance to the functioning of the generator if it is not adequately protected against them.
Step-by-Step Guide to Build a Portable Generator Enclosure
You have all the materials. The general features of the generator shed plans have been outlined. What’s now left is the mind. You need to prepare your mind by allowing for a lot of focus and discipline to start and get this project done.
We shall take it task by task so that we don’t jump any step.
Task 1: Construct the Frame
To start the project, the frame is the first part of the shed to build. How do you go about building the frame?
- Step 1: Set out the plans as you would want it.
- Step 2: Saw out components from the 2×4 lumber in the dimension set out in the master design.
- Step 3: Put 2 ½” galvanized screws in the perpendicular beams after you have bored model holes into the square-cornered frame joists. Make sure the edges of the frame are flush. After this, now add water-resistant adhesive to join the edges and corners.

Now that your frame is ready, what’s next?
Task 2: Fit the enclosure floor
The floor where your shed will rest is integral to the durability of your shed. The procedure is simple and short.
- Step 1: Simply cut the square size of the floor that will house the shed from the 3/4″ plywood.
- Step 2: With the help of the 1 5/8” screws, join the panels to the floor. Make sure the screw is secure and the tightenings firm. To make this happen, you need to drill the floor a few meters deep before inserting the screws.
The enclosure floor is ready for use. Before we move to the next, hope you remember the first two tasks? Prepare the frame, and then fit the floor. It looks good. Let move on to the next task.

Task 3: Build the door header
You recall we talked about getting 2×4 lumber and ½ plywood ready. Use the two for the shed door header by simply assembling the wall frames.
- Step 1: Your glue will help you attach the joints before inserting 2 1/2″ screws. The screw helps to tighten all the parts together firmly
- Step 2: Make sure the frame edges flush before the screws get into them. The edges must also align. For better results and to avoid the wood splitting, you can drill pilot holes into the wood before putting the screw.
The last task sounds a lot easier. The next task won’t take more than 3 to 4 minutes to finish.
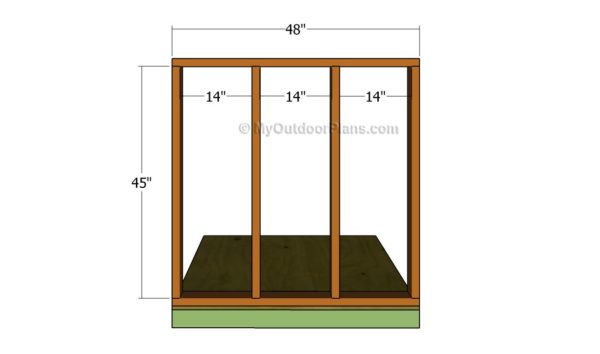
Task 4: Fit the Front wall
The next task is to get the front wall of the generator enclosure assembled. Let’s refer to the plans. You can see that there is a need for enough room where the door can move to and fro. If your design doesn’t accommodate that, kindly make a new arrangement or adjust the plan.
Task 5: Build and fit the Back wall
As much as your generator needs a front wall, the back wall is equally necessary. The walls are to protect the generator. Make sure the studs placed at both ends of the walls are adequately studded
- Step 1: Drill holes into through the plates
- Step 2: Insert the ½’’ plywood filings between the plates.
- Step 3: Get the 2 ½ screws into the studs
- Step 4: After building the back walls, the fitting becomes easy. Simply join to the back wall of your generator shed a T1-11 siding. Make sure the edges align and are flush. The panels should also be tightly secure by inserting nails every 8 inch
Precaution: Make sure the edges align; and that they are flush; the corners should be square.
Task 6: Building and Fit the front and back walls
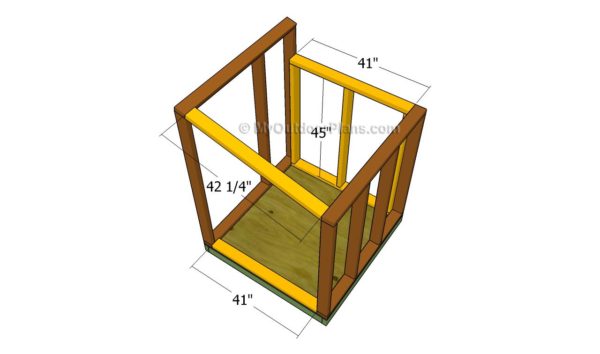
Now that we have the two walls, the next thing is to fit them to the floor shed.
- Step 1: With flush and aligned edges and square corners made, so with the use of a spirit, you can drill pilot holes into the bottom plates.
- Step 2: With the help of your 3 ½”, lock down the floor tightly.
- Step 3: After building the front wall, simply fit the siding panels to it. Try and cut out the panels. Smoothen the edges with sandpaper, align them and make them flush and secure by attaching them into place with the help of appropriate nails.
Task 7: Build the side walls.
You’ll need the 2×4 lumber, screws, and drilling tool.
- Step 1: Cut the part of the lumber in the right dimensions and then gather together the back wall.
- Step 2: Get the pilot holes drilled through the plate and then insert the 2 ½″ screws into the roomy studs.
Task 8: Assemble the frame of the generator shed
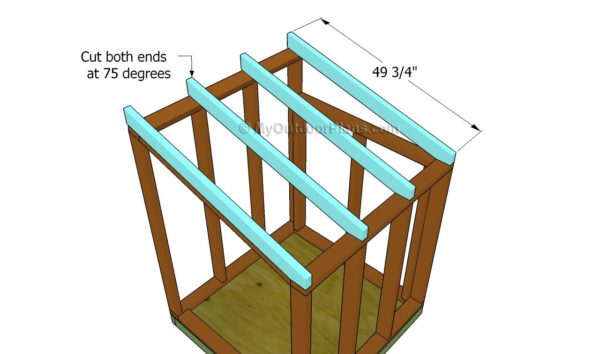
Now that the front, back, and side walls have been built and fitted to the floor shed, it is time to assemble the frame of the generator shed.
- Step 1: With aligned flush edges and square corners, the side walls must be fitted to the floor of the shed.
- Step 2: Tighten the edges and frames with 3 ½ ” screws to make secure. Also, lock the walls adjacent to each other together with the use of the 2 ½″ screws.
Warning: Don’t forget to drill pilot holes before using the screw.
Faqs
What are the general features of a generator shed plan?
A while ago, we learned about giving a great and workable design for the portable generator enclosure plans. This is important. For a better and clearer work plan, we shall highlight some of the general features of the generator shed plans.
Generally, a big and noisy generator for food trucks can be somewhat disturbing when not properly housed. A big generator enclosure allows you to lock your generator in its own place, giving it both shed and protection while sparing you some reasonable level of noise pollution. Also, the purpose of having the shed is to give backup power to the generator because it is being wired to a transfer switch. Having said that, the generator shed plans should consist of the following:
– The generator shed plans should contain dimensions of all the components that will be used to build the floor, fit the walls, roof, and doors.
– The floorboards of the generator enclosures should be spaced at least ½ inch apart to give room for adequate airflow into the enclosure.
– There should be fresh air louvers to allow enough airflow into the air intake.
– Your generator enclosure plan should also consider the installation of an exhaust fan, which helps to ventilate garret spaces around the generator enclosure wall.
– Enough space should be provided in the generator plan to allow the shed door to remain open for fresh air in and for the exhaust to escape.
Building a Generator Shed: How much does it cost?
If you look at the list of the materials listed below, you find out that something in the region of $200 will be enough to start and finish the building of a portable generator enclosure. Well, that sounds like a small price to pay. If you want something big, then be ready to commit more cash.
Essentially, the size of your shed designs depends on the price you’re able to part with. The cost of the generator enclosure accessories and the décor you’re looking to add, including transfer switch and fans, are factors you have to take into account when planning a generator shed.
How do we set up the electrical systems for the Generator enclosure?
This is an interesting question at this point. And we shall all go through the process together. The electrical systems of your portable generator shed plans are designed based on your needs. Items needed for this purpose are specially designed and purchased as they don’t come with our original plans. There is room for modifications based on your needs.
The electrical design of the generator shed is often constructed against the fence. Connect the conduit junction box with the conduit from the underground. The conduit goes to the changeover switch that is located somewhere in the house. The conduit is then connected to the generator shed.
The systems contain right, center, and left panels. The reliance controls-made center panel consists of a 10 circuit 30A transfer switch. The left panel is a 100A electrical sub-panel.
Are there kinds of Generator enclosures?
Absolutely! There are a variety of options available to you when thinking of owning a generator shed. Although you may have to buy more materials, spend more time and money on design, the procedure of building each of the sheds is the same.
We have the lean-to roof style of shed. This design comes with a lot of features, including a hinged deck and an openable rooftop. The style also features a fixed roof with side doors or walls. This style allows you to build the shed against a building wall or fence. It is not affected either by rain or snow.
There is also the gable roof style. This design is built more like those traditional small-looking houses you find in the counties. But they serve as a great shed for your generator.
The other style of generator shed is the metal shed. This is the most budget-friendly and cost-effective of the three kinds we’ve listed. This is because it is built of steel. You don’t have to build a floor for this because it doesn’t use it. You can build the shed on top of the generator to protect it against Jobsite or campsite.
Conclusion
Aren’t these steps simple enough to understand? We said earlier that you have within just 24 hours to complete this project. So, you should be able to spare that. The mechanism is easy; the duration required is relatively marginal.
Isn’t the cost affordable enough to bear? Well, because you’re willing to let go of those unnecessary spending that constantly stashes away your little income, you should be able to spare at most $500 to get this done once and for all.
You wouldn’t need to hire the services of any professionals any longer the next time you bring home those gigantic generators. Your home need not scatter with engine oil. Take the bold step now for the DIY mechanism: it is easy, simple, time-conserving, and cost-effective.


