Skip the run-of-the-mill, ordinary wall decor. Instead, see this tutorial and build your own Gorgeous Pallet Wall Clock! You just need a couple of deck boards and about five dollars to “make time” :)
What you need:
- Long shaft clock movement and clock hands (available at home centers and hobby stores)
- Safety tools – such as goggles, gloves and more
- Jigsaw, chop saw or a simple saw
- Sander, such as a random-orbit sander or palm sander with 100 or 120 grit paper
- Hammer and nails
- Stain and metal paint
- Small craft paint brush(s) – for the metal paint
- Chip brush, paint brush or sponge brush for stain
- Clean, low-lint rags (such as old T-shirts) for removing excess stain.
- And the most important: pallet scraps
Step by step instructions:
PLAN the width and the length of your clock. It’s the size of the minute hand from the center + one inch TWICE. This size consists of 3 deck board pieces; 2 thin and one thicker.
SAW the measured pallet boards – use a power saw of your choice or a simple saw.
CUT two more small, thin pieces of deck board. These will be used to hold the three slats together from the back.
SAND all surfaces of the wood completely. Use a sander with a 100 or 120-grit paper, but you can also easily sand it by hand.
STAIN the deck boards per the manufacturer’s directions. Have scrap rags (such as T-shirts or similar) ready to wipe excess stain off. We stained the wood on all sides with a mahogany-colored wood stain.
JOIN the parts together with nails after the stain has dried completely.
IMPORTANT TIP BEFORE PROCEEDING: Because of the pallet slat thickness (approximately 0.6″), use a “LONG SHAFT” clock movement kit. Short ones won’t work.
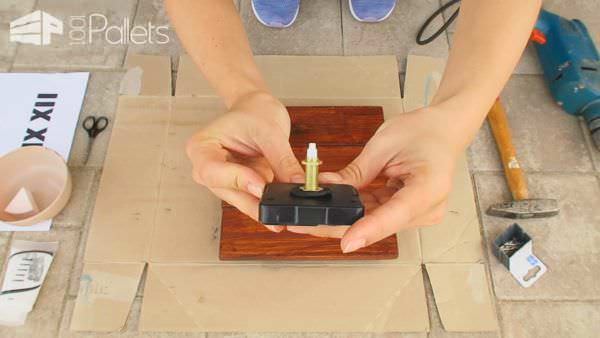
DRILL the middle of the clock and put in it the clock movement. Note the order of the clock hands: hour, minute and second.
PAINT the numbers near the edges: XII, III, VI, IX – we used silver metal foiling paint. It looks so good on the stained surface, and this type of paint covers well.
INSTALL the kit per the directions, and then insert a single AA battery into the clock motor (or whatever battery size your clock movement kit requires).
SET the time.
MOUNT a wall hanger bracket on the back side.
WATCH our tutorial video below! :)


Very interesting a seems straightforward. Will try clock first..I have access to a lot of pallet wood.