Think Outside of the Box with PureColor’s Sustainable Fine Finishes! Blog Part 2 by Heather Stiletto. You can check part 1: Wood Stain: A Review of Purecolor Inc. Revolutionary Stains
The phrase, “Think outside of the box” reverberates strongly with us. It means don’t just keep doing what you’ve been doing. Look at the problem in a different way. So here’s one example: stains are ONLY for wood. That’s it. At least that’s what the big manufacturers want you to think. But what if you could use it for something else? You can if you use TrueColor’s line of NON-VOC, non-toxic, pet & kid-safe line of stains! I managed to use PureColor’s line of stains to make some money, too!
PureColor’s Sustainable Fine Finishes – For More Than Just Wood?
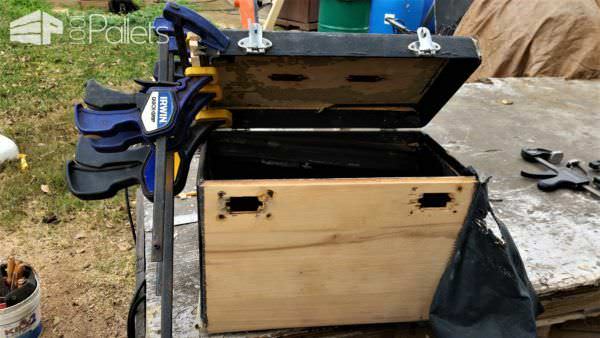
What if I told you that I used TrueColor’s line of stains to help repair a vintage, material-covered sewing machine box? You’re probably looking at this photo and thinking this box isn’t very salvageable, but with the help of TrueColor’s products, I managed to rescue this item, repair it to an acceptable level, and then sold it (and the machine) for a pretty penny!

This box looks pretty bad, but you can’t see all of the damage in this photo. On the left side of this lid, the wood was entirely missing. The locks were pried out of the box (and the locks weren’t locked!), causing more wood damage. Then, on top of injury, there was an insult. This damaged box was pushed into a storage area, and other things were piled on top, severely warping the top altogether. Thankfully, other than needing a good oiling and new belt, the machine inside was surprisingly pristine.
Why Would Anyone Try To Save This Box?

I had to restore this box, or I couldn’t ship it. My priority was the set of locks because if I can’t latch them, it would’ve allowed the machine to flop around. I unlatched them (they’re old-style briefcase latches), and used a vice to hold them while I carefully pounded them flat with a soft-headed mallet. When I got the flat, I used my rotary tool (in my case, it’s a Dremel) with a polishing wheel and used that, plus rubbing compound, and then polishing compound to make them usable. I cut out the old rivets and cleaned up the backside of the latches too. I couldn’t fix the deepest gouges without damaging the lock mechanisms, but they were much more functional and flat.
Now, onto the wood underneath. Since the locks had been literally pried out, I suspected there was some significant damage to the supporting boards – so much so that I feared I’d have to replace that section of wood. The only way to know was to get a good look at it, which meant stripping it down.
The Fake-leather covering was so deteriorated from neglect over the years that the box had a case of black dandruff where everything was flaking off. The material was thin, threadbare in spots and worn through in others, particularly along the corners. But all of that was irrelevant if I couldn’t make the latches work. So, I carefully sliced down the corner with an extremely sharp utility knife (brand new blade). These old boxes (this one from the ’50s) frequently used natural hide glue, and the trick was to heat it. I used a heat gun on the low setting and carefully started pulling when it got warm, and you could smell the glue. This took patience, but it slowly peeled back without tearing.
Repair & Prep:
In the photo above, you can see how threadbare the material was. The damage around the lock area was from the screwdriver being applied to rip and tear the locks free. When I got it exposed, I was quite relieved to find that although there was damage, it was more splintered rather than chunks missing, and the rivet holes were relatively intact. I used Gorilla Glue carefully to the splintered areas and clamped only until it was the correct shape and thickness again, and let it set. I had to repair both sides, but the right side was worse.
The Lid…How Can I Fix This?

Next, I tackled the second, and significantly problematic issue: the lid. Whoever pried the locks probably got one latch pulled (the left one), and then simply tried to lift the box lid to see what was inside. Unfortunately, this ripped out a piece of wood entirely. The only thankful part was that it didn’t destroy the dovetails in the corresponding parts.
I used a piece of poplar pallet wood (of course) since it was a close match in tone and pattern, and hand-cut dovetails with a coping saw. It may not have been the right saw, but it worked fine! I cut the dovetails quite proud since the corners were rounded over and I wanted to have wiggle room to sand. I glued it in place but had problems with the VERY warped top that had sagged down into a U-shape.
Warped Wood!
Since I’d removed the inner liner, I just used a spray bottle and misted it from the underside several times until I’d saturated it enough so that it regained a little flexibility. Then I slowly clamped it, spritzing and tightening every few minutes until I got it ALMOST flat. I reached a point, which without steaming, the wood on the top would’ve cracked, so I had to stop there. Not perfect, but as good as it would get without really dismantling the whole top, and at this point the machine was sold, so I was in a time crunch.

The lid is repaired, but not done…
Once the glue dried, I used a random-orbit sander to round over the corners. I didn’t have to use any wood fillers or anything because I was going to re-cover the end. You can see a slight amount of residual warping on the top, but it’s a lot better. It was bowed approximately an inch! However, just because it matched on the outside, didn’t mean the lid would close yet.

It had a carved-out portion where it married to the bottom of the box, so I used a set of carving knives to very carefully remove the excess material. It had a curved portion about 3/8” in from the edges, that tapered to a very thin edge. I simply copied the curve from the other side.

I understand at this point you’re probably wondering when I’m going to use PureColor stains. It’s coming – I promise!
Now that I had the wood repaired, I had to recover it. I had some padded black vinyl material that actually had a similar texture/pattern, but with the padding, it wouldn’t match with the rest of the thin covering. So, I used the heat gun again and pulled out a section of the inner liner where it had obviously had damage from rubbing over the years, but there was enough to cover the top. I used TiteBond hide glue and carefully matched the top seam, tucking the new part under the top like the other side was. The TiteBond glue got tacky feeling fairly rapidly, so it held the material and was surprisingly easy to install. The only problem is that it was SO threadbare! I could see the pretty white wood through it, as well as the black plastic of the fake hide texture was mostly flaking off, so the threads that were the backer part of the material were showing too.
Let’s get to staining!
Here’s where TrueColor’s line of stains came to the rescue. I used “Inkblot” and a soft rag that I saturated a corner with and carefully blotted until I couldn’t see the wood or the bare threads (this was all after the glue dried, of course). It covered easily and BEAUTIFULLY! The other amazing part was that PureColor stains dry so fast! They were dried in under a ½ hour! This allowed me to glue the rolled-back parts of the top material back and glue them, finishing this step!

More problems to address…
But TrueColor isn’t done yet. I liked how the patch job came out, and then I started critically looking at the case. I re-glued the front material that I’d peeled back, and that helped, and re-glued the corners where the material was fraying…. But it was still just ratty looking. I carefully cleaned the box with a very lightly damp rag and blotted most of the dust and filth off of it, but it still looked grimy and beat up.
Blot it on!
So, I used that same staining rag and blotted TrueColor’s stains over most of the scratches and blemishes, paying close attention to the corners and other damaged areas. It was a tough balance of staining it until it looked brand new compared to the act of staining causing more black dandruff. Finally, I got to a point where I couldn’t improve the box more. However, TrueColor stains are non-VOC, pet and kid-safe, AND water-based, they dried RAPIDLY and didn’t stink up the place. I’d finish one side, and by the time I was half-way complete with the next side, the first was already dry. This prevented warping more boards! I didn’t touch up every mark but did attack the worst spots.

So…. Here’s the final project, and I couldn’t have done it without PureColor stains.


Other stains may have done a similar job, but they would’ve just smelled for weeks, and that wasn’t going to work when I had to ship the box literally the next day. When the buyer received the machine, she was stunned with how good the machine worked (I went through it very carefully and had it purring). But, she was expecting that broken box. She was extremely impressed! I would hope so since the latches grab firmly, they were polished, and all the remaining hardware had been buffed as well.

Thank you to Pure Color Sustainable Fine Finishes for being so versatile! I never thought they would be a life-saver for aged, delicate material, but they were!
You can find out more at www.purecolorinc.com
I did this 2nd review independently. I wasn’t paid to do it and didn’t get any products as payment. HS.
Check out my outdoor “Cattio” for more inspiration.


